I wrote 21-Points Health to track my health. I found that knowing how you're doing on a weekly scale is informative and motivating. However, one of the things I found frustrating was you could never look back and see how you did over a month.
In the JHipster Mini-Book, I never mention developing 21-Point Health's history feature. Today, I'd like to explain how I implemented it using Angular Calendar.
When I developed v1.0 and v2.0 of 21-Points Health, it used AngularJS and AngularUI Calendar. It looked as follows when displaying your daily points in a month view.

The first thing I had to do was find an Angular version of the library that provided the same functionality. Luckily, I stumbled upon Matt Lewis's angular-calendar library. Not only was it easy to use, but Matt provided great support when I ran into issues.
Adding a History Feature with Angular Calendar
I started by installing angular-calendar with yarn.
yarn add angular-calendar
Then I took a look at component.ts from the kitchen-sink example. I copied the examples, and made sure I could get things to work with static data. Then I went to work on populating it with real data. In my history.component.ts, I added dependencies on all the existing services for points, blood pressure, weight, and others. Most of the local variables in this component are from the example I mentioned earlier.
export class HistoryComponent implements OnInit, OnDestroy {
    modalRef: NgbModalRef;

    view = 'month';

    viewDate: Date = new Date();

    modalData: {
        action: string;
        event: CalendarEvent;
    };

    eventSubscriber: Subscription;

    actions: CalendarEventAction[] = [
        {
            label: '<i class="fa fa-fw fa-pencil"></i>',
            onClick: ({event}: { event: CalendarEvent }): void => {
                this.handleEvent('edit', event);
            }
        },
        {
            label: '<i class="fa fa-fw fa-times"></i>',
            onClick: ({event}: { event: CalendarEvent }): void => {
                this.handleEvent('delete', event);
            }
        }
    ];

    refresh: Subject<any> = new Subject();

    events: CalendarEvent[] = [];

    activeDayIsOpen = true;

    currentAccount: any;

    constructor(private pointsService: PointsService, private bloodPressureService: BloodPressureService,
                private weightService: WeightService, private principal: Principal,
                private preferencesService: PreferencesService, private router: Router,
                private eventManager: JhiEventManager) {
    }

    ngOnInit() {
        this.principal.identity().then((account) => {
            this.currentAccount = account;
        });
        this.populateCalendar();
    }
...
}
When the component initializes, the user's identity is grabbed and the calendar is populated. The
populateCalendar() method is where all the data fetching and event creation happens.
populateCalendar() {
    const monthEnd = endOfMonth(this.viewDate);
    const month = format(monthEnd, 'YYYY-MM');

    this.pointsService.byMonth(month).subscribe((response) => {
        response.json.points.forEach((item) => {
            const value = item.exercise + item.meals + item.alcohol;
            this.events.push({
                start: startOfDay(item.date),
                end: endOfDay(item.date),
                title: value + ' Points',
                color: colors.green,
                draggable: false,
                actions: this.actions,
                meta: {
                    id: item.id,
                    entity: 'points',
                    value,
                    notes: item.notes ? item.notes : ''
                }
            });

        });
        this.refresh.next();
    });
    ...
}
The call at the bottom updates the calendar events. The pointsService.byMonth() method just makes a
call to an API endpoint.
byMonth(month: string): Observable<ResponseWrapper> {
    return this.http.get(`api/points-by-month/${month}`)
        .map((res: any) => this.convertResponse(res));
}
The API is in Java, because we're using JHipster after all!
/**
 * GET  /points-by-month : get all the points for a particular current month.
 */
@GetMapping("/points-by-month/{yearWithMonth}")
@Timed
public ResponseEntity<PointsPerMonth> getPointsByMonth(@PathVariable @DateTimeFormat(pattern="yyyy-MM")
                                                       YearMonth yearWithMonth) {
    // Get last day of the month
    LocalDate endOfMonth = yearWithMonth.atEndOfMonth();
    List<Points> points =
        pointsRepository.findAllByDateBetweenAndUserLogin(yearWithMonth.atDay(1), endOfMonth,
                                                          SecurityUtils.getCurrentUserLogin());
    PointsPerMonth pointsPerMonth = new PointsPerMonth(yearWithMonth, points);
    return new ResponseEntity<>(pointsPerMonth, HttpStatus.OK);
}
I repeated this pattern to get weigh-ins and blood pressure readings by month. You can see a JUnit test for the above
method in PointsResourceIntTest#getPointsByMonth.
To calculate the points I received in a day and for the whole week, I used angular-calendar's beforeMonthViewRender() lifecycle method.
beforeMonthViewRender({body}: { body: CalendarMonthViewDay[] }): void {
    body.forEach((cell) => {
        cell['dayPoints'] = cell.events.filter((e) => e.meta['entity'] === 'points');
        cell['weekPoints'] = cell.events.filter((e) => e.meta['entity'] === 'totalPoints');
    });
}
The month view in my history template has a custom cell template that renders daily points, as well as weigh-ins, and blood pressure readings.
<mwl-calendar-month-view
    *ngSwitchCase="'month'"
    [viewDate]="viewDate"
    [events]="events"
    [refresh]="refresh"
    [activeDayIsOpen]="activeDayIsOpen"
    (dayClicked)="dayClicked($event.day)"
    (eventClicked)="handleEvent('Clicked', $event.event)"
    (eventTimesChanged)="eventTimesChanged($event)"
    (beforeViewRender)="beforeMonthViewRender($event)"
    [cellTemplate]="customCellTemplate">
</mwl-calendar-month-view>
The custom template is defined using ng-template and using let-* syntax, it inherits all the variables and methods from the default template. Pretty slick!
<ng-template #customCellTemplate let-day="day"
             let-openDay="openDay"
             let-locale="locale"
             let-tooltipPlacement="tooltipPlacement"
             let-highlightDay="highlightDay"
             let-unhighlightDay="unhighlightDay"
             let-eventClicked="eventClicked"
             let-tooltipTemplate="tooltipTemplate"
             let-tooltipAppendToBody="tooltipAppendToBody">
    <div class="cal-cell-top">
        <span class="cal-day-badge bg-{{day.dayPoints[0].meta.value >= 2 ? 'success' : 'warning'}}"
              *ngIf="day.dayPoints.length">
            {{ day.dayPoints[0].meta.value }}
        </span>
        <span class="cal-day-number">{{ day.date | calendarDate:'monthViewDayNumber':locale }}</span>
        <div class="cal-day-notes" *ngIf="day.dayPoints.length" [ngbPopover]="day.dayPoints[0].meta.notes">
            {{day.dayPoints[0].meta.notes}}
        </div>
    </div>
    <div class="cal-events" *ngIf="day.events.length > 0">
        <div class="cal-event"
            *ngFor="let event of day.events"
            [style.backgroundColor]="event.color.primary"
            [ngClass]="event?.cssClass"
            (mouseenter)="highlightDay.emit({event: event})"
            (mouseleave)="unhighlightDay.emit({event: event})"
            [mwlCalendarTooltip]="event.title | calendarEventTitle:'monthTooltip':event"
            [tooltipPlacement]="tooltipPlacement"
            [tooltipEvent]="event"
            [tooltipTemplate]="tooltipTemplate"
            [tooltipAppendToBody]="tooltipAppendToBody">
        </div>
    </div>
</ng-template>
I was able to re-use the modals for editing entities to allow editing events. This was make possibly by Angular Router and its ability to open modals based on their URLs.
handleEvent(action: string, event: CalendarEvent): void {
    action = (action === 'Clicked') ? 'edit' : action;
    this.modalData = {event, action};
    const url = this.router.createUrlTree(['/', {outlets: {popup: event.meta.entity + '/' + event.meta.id + '/' + action}}]);
    this.router.navigateByUrl(url.toString());
}
I listen for the changes made by modals using JHipster's EventManager and refresh the calendar accordingly.
registerForChanges() {
    this.eventSubscriber = this.eventManager.subscribe('pointsListModification', (response) => this.reset());
    this.eventSubscriber = this.eventManager.subscribe('bloodPressureListModification', (response) => this.reset());
    this.eventSubscriber = this.eventManager.subscribe('weightListModification', (response) => this.reset());
}

reset() {
    this.events = [];
    this.populateCalendar();
}
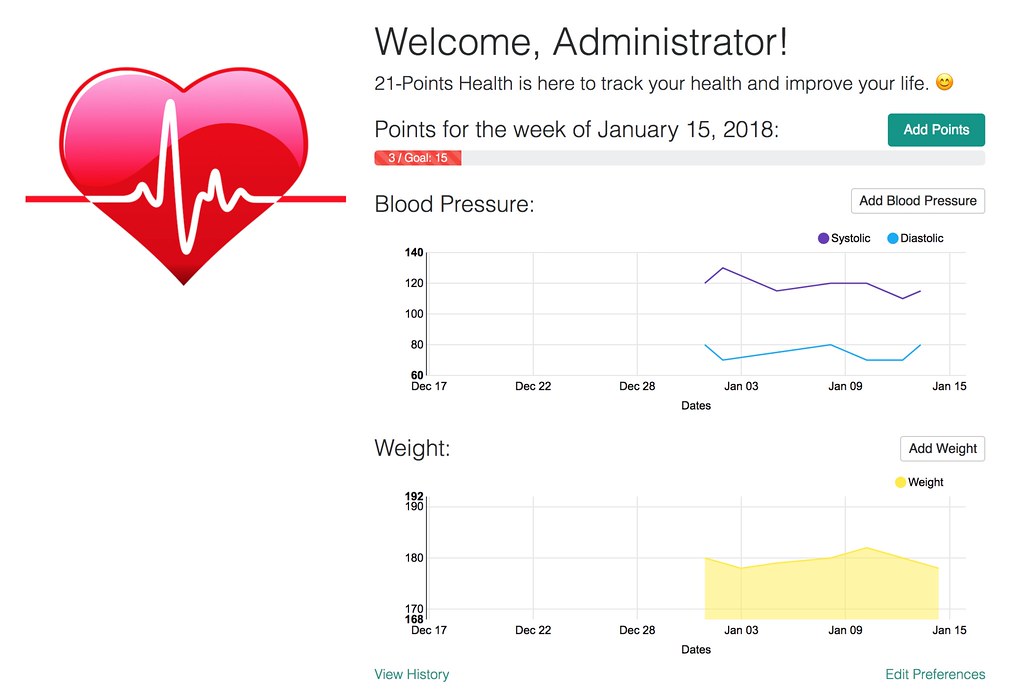
When I got all of this working, I was pretty pumped, but I wanted more. I wanted to see the progress bar from the home page at the end of each week. That way, I'd know how I performed against my goals each week. Below is what the progress bar on the home page looks like.
Adding Progress to the End of Each Week
I implemented the logic in my history.component.ts to 1) figure out all the Sundays (ends of week) in a month, and 2) get the points by week for that date.
const weeklyGoal = preferences.weeklyGoal;
const monthStart = startOfMonth(month);
const daysInMonth = getDaysInMonth(month);

const sundays = [];
for (let i = 0; i <= daysInMonth; i++) {
    const date = new Date(monthStart.getFullYear(), monthStart.getMonth(), i);

    if (date.getDay() === 0) {
        sundays.push(date);
    }
}

sundays.forEach((sunday) => {
    this.pointsService.byWeek(format(sunday, 'YYYY-MM-DD')).subscribe((data) => {
        const pointsByWeek = data.json;
        this.events.push({
            start: startOfDay(sunday),
            end: endOfDay(sunday),
            title: pointsByWeek.points + '/' + weeklyGoal + ' Points',
            color: (pointsByWeek.points >= 10) ? colors.green : colors.red,
            cssClass: 'd-none', // hide as an event dot
            draggable: false,
            meta: {
                entity: 'totalPoints',
                value: pointsByWeek.points,
                goal: weeklyGoal || 10
            }
        });
        this.refresh.next();
    })
});
The Java API took about a third less code!
/**
 * GET  /points-by-week/yyyy-MM-dd : get all the points for a particular week.
 */
@GetMapping("/points-by-week/{date}")
@Timed
public ResponseEntity<PointsPerWeek> getPointsByWeek(@PathVariable @DateTimeFormat(pattern="yyyy-MM-dd") LocalDate date) {
    // Get first and last days of week
    LocalDate startOfWeek = date.with(DayOfWeek.MONDAY);
    LocalDate endOfWeek = date.with(DayOfWeek.SUNDAY);
    List<Points> points = pointsRepository.findAllByDateBetweenAndUserLogin(startOfWeek, endOfWeek, SecurityUtils.getCurrentUserLogin());
    return calculatePoints(startOfWeek, points);
}

private ResponseEntity<PointsPerWeek> calculatePoints(LocalDate startOfWeek, List<Points> points) {
    Integer numPoints = points.stream()
        .mapToInt(p -> p.getExercise() + p.getMeals() + p.getAlcohol())
        .sum();

    PointsPerWeek count = new PointsPerWeek(startOfWeek, numPoints);
    return new ResponseEntity<>(count, HttpStatus.OK);
}
The rendering of the points-by-week data required the fewest lines of code, thanks to the power of components and ng-bootstrap.
<div class="cal-cell-bottom">
    <ngb-progressbar max="21" [value]="day.weekPoints[0].meta.value" [striped]="true"
                     *ngIf="day.weekPoints.length && day.weekPoints[0].meta.value"
                     [type]="(day.weekPoints[0].meta.value >= day.weekPoints[0].meta.goal) ? 'success' : 'danger'">
        <span ngbTooltip="{{day.weekPoints[0].title}}">
            {{day.weekPoints[0].meta.value}} / {{day.weekPoints[0].meta.goal}}
        </span>
    </ngb-progressbar>
</div>
The end result is something I'm proud of. Below is what it looks like with a bunch of sample data.
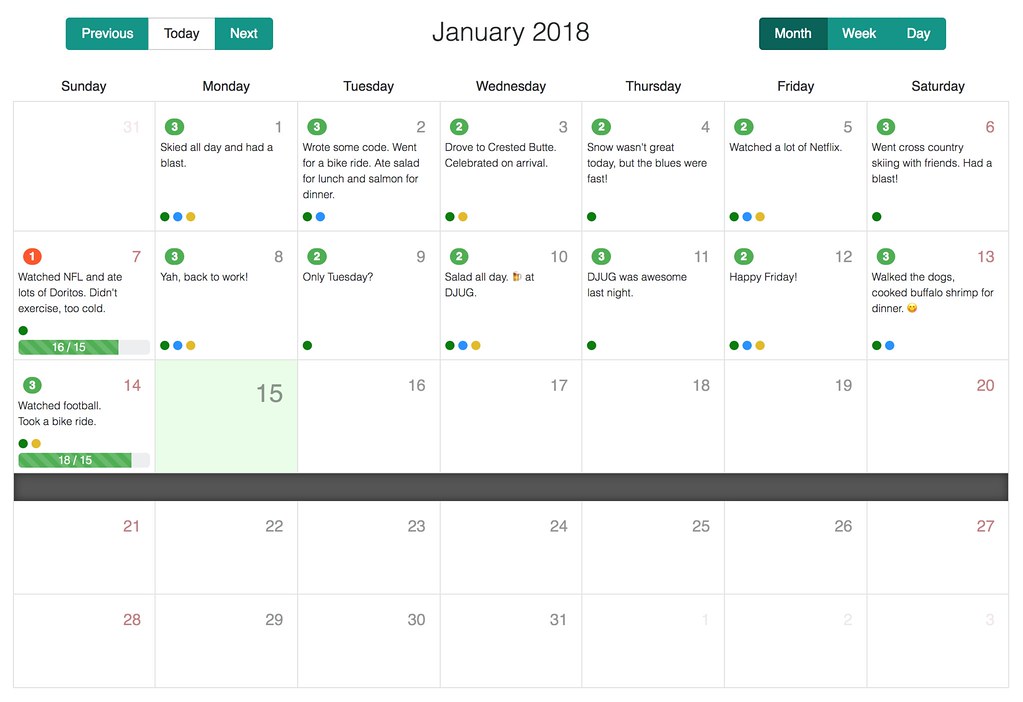
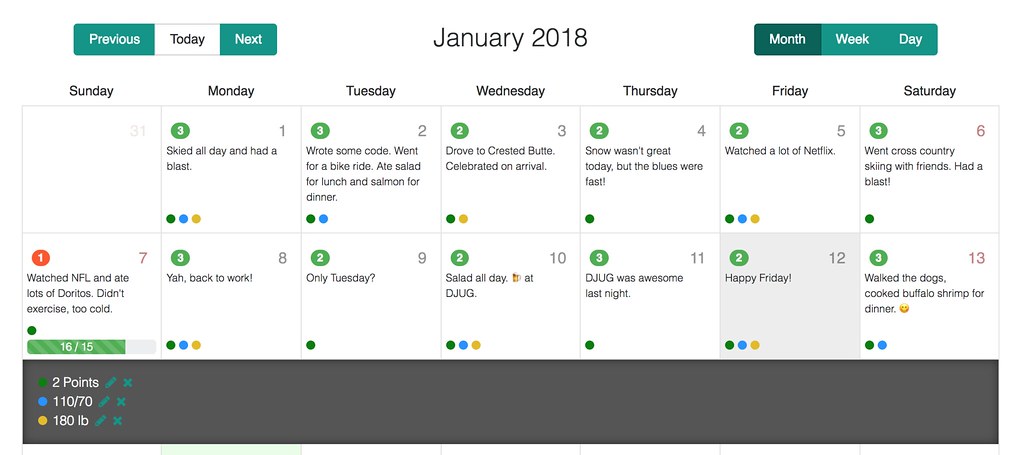
Clicking on a day will reveal the events below, where you can edit or delete them.
See 21-Points Health in Action
I'd love to say you can create an account on www.21-points.com and start monitoring your own health. However, I've been experiencing a database sequencing problem ever since I upgraded, and it's possible login and/or registration will fail for you. If you happen to know a workaround for this issue, I'd love to hear about it.
In the meantime, you can clone the project from GitHub and run it locally:
git clone https://github.com/mraible/21-points.git
cd 21-points
yarn && yarn webpack:build
./gradlew
Login with admin/admin or user/user and you can start tracking your daily health.
Learn More about JHipster
You can learn more about JHipster at www.jhipster.tech or by downloading and reading the JHipster Mini-Book v4 from InfoQ.
If you prefer videos to reading, check out Get Started with JHipster 4:
... or building and deploying microservices with JHipster.
If you're in the Rocky Mountains, I'll be speaking about JHipster a couple of times in the coming months:
- Wednesday, January 24: Microservices for the Masses with Spring Boot, JHipster, and OAuth at Denver Microservices Meetup
- Thursday, February 15: Microservices for the Masses at Utah JUG
Please let me know if you have any questions about this post — or suggestions for improvement — in the comments below.